Campaigns
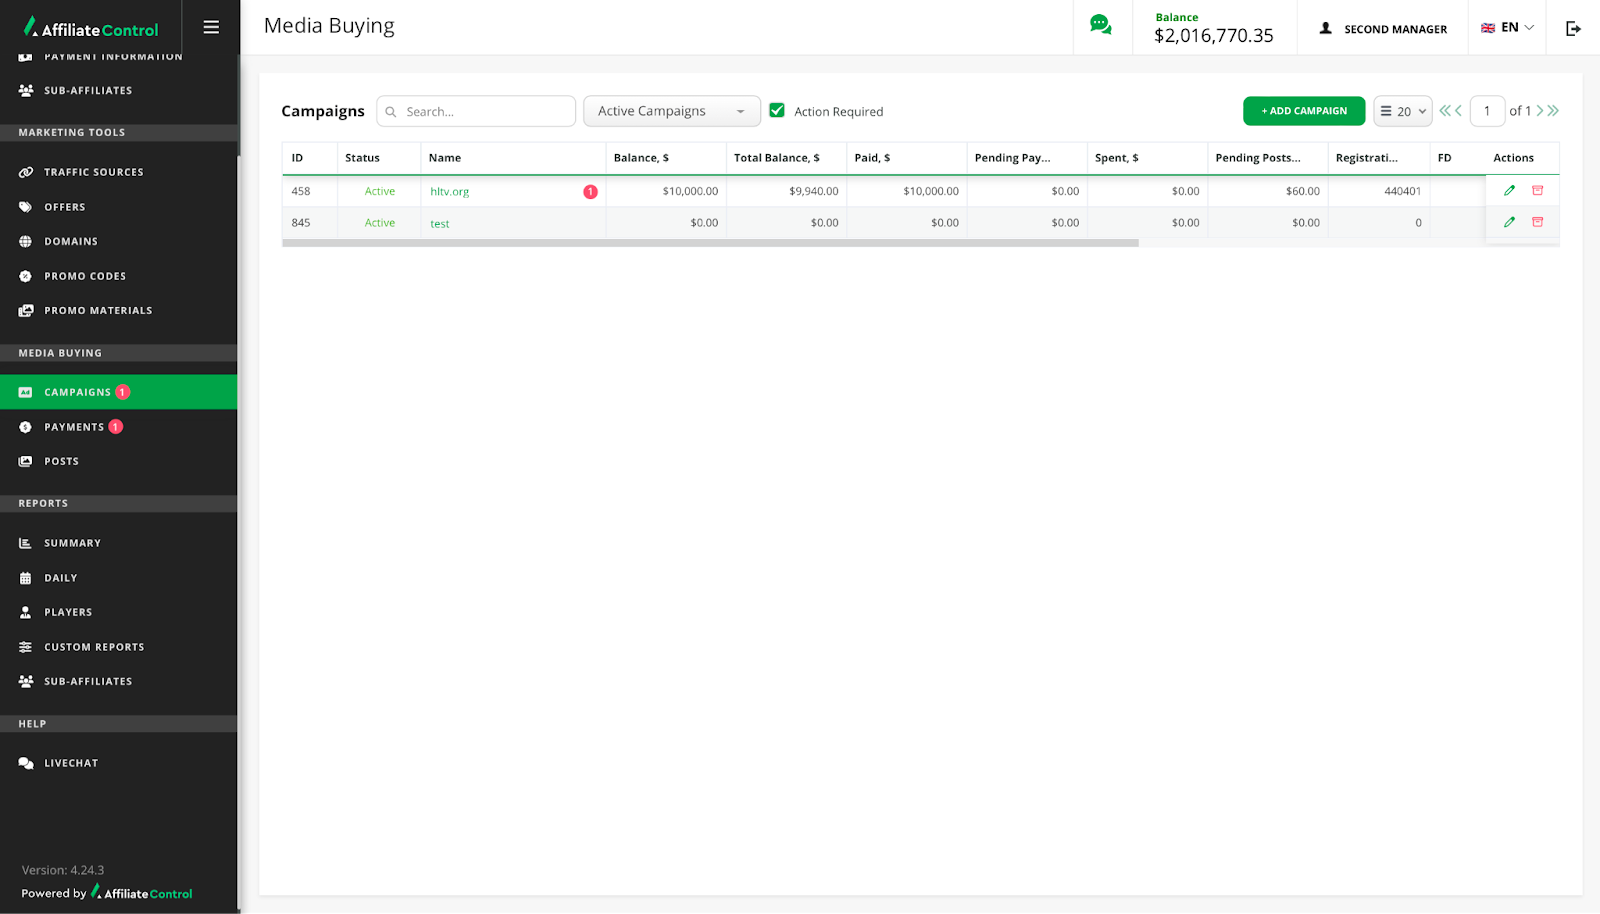
The "Campaigns" subsection contains a list of advertising campaigns for which the affiliate requests a budget.
The number next to the name of the subsection indicates that one of the elements has moved to a new status and requires attention.
The following functions are displayed above the list of campaigns:
- Search. The search works by the name of the campaign.
- Filter. Filters the list of campaigns by the "Active", "Archived" or "All" status.
- The "Action required" checkbox. Moves all campaigns marked as requiring attention to the top of the list.
- The "Add Campaign" button. A detailed description of the process of creating a new campaign is described at the link.
- Number of rows. Setting the number of rows per sheet.
- Pages. Shows which page is open and gives an affiliate the opportunity to switch to another one. Click on the arrow to go to another page. Or enter the page number in the number field.
The number next to the name of the subsection indicates that one of the elements has moved to a new status and requires attention.
The list is displayed as a table with the following columns:
- ID. The sorting function is available for the column.
- Status (active or archived).
- Name. The number near the name means that some elements inside require attention.
- Balance. The amount of confirmed payments minus the amount of confirmed publications. The sorting function is available for the column.
- Total balance. The affiliate's balance sheet, including costs that have not yet moved to approved status. The sorting function is available for the column.
- Paid. The amount of payments made. The sorting function is available for the column.
- Pending payment. The amount of unconfirmed payments. The sorting function is available for the column.
- Spent. The amount of the confirmed costs. The sorting function is available for the column.
- Pending posts. The amount of unconfirmed costs. The sorting function is available for the column.
- Registrations. Number of registrations.
- First deposits. The number of first deposits.
- Deposits. The amount of deposits.
- Profit. Shows the profit from the players' bets.
- Cost per player. It is calculated according to the formula: the amount of approved payments / the number of first deposits.
- Created. The date the campaign was created. The sorting function is available for the column.
- Updated. The date of the last change. The sorting function is available for the column.
- Actions. There are two buttons available for each campaign: edit (click to make changes to the name or description of the campaign), archive.
Warning
If the campaign is in the "Archived" status, then no actions can be performed with it. The campaign can be restored manually using the "Restore" button. In this case, it switches to the "Active" status and the affiliate can continue working with the campaign.
Creating a new campaign
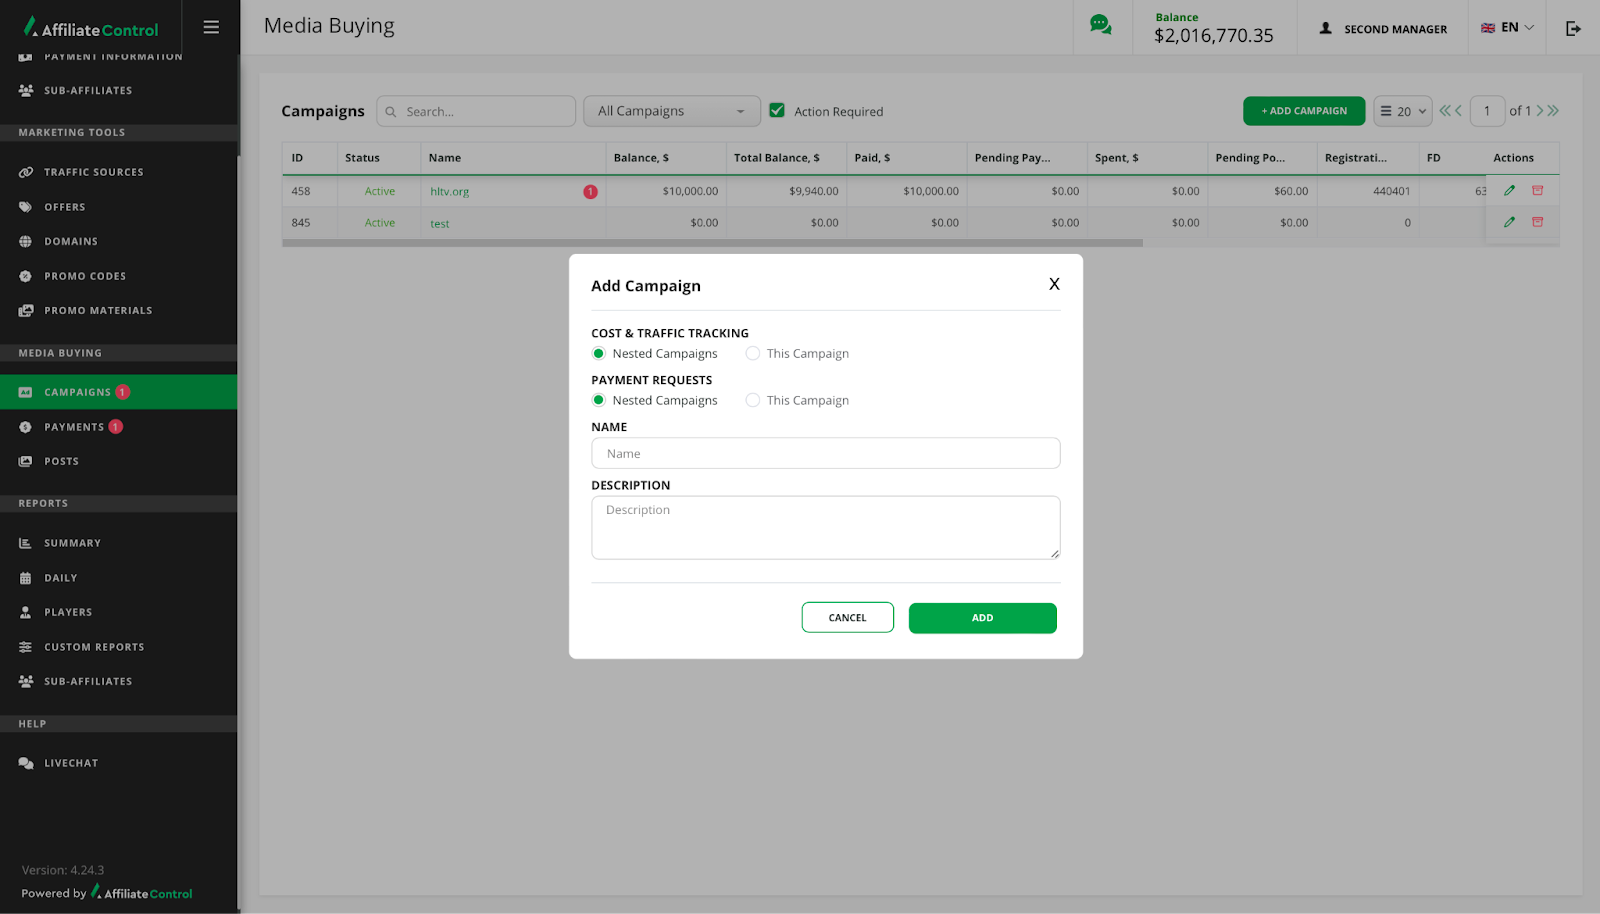
In order to add an advertising campaign, the affiliate need to click on the "Add campaign" button above the table, then fill in all the fields in the pop-up that opens, following the following instructions:
- Select a combination of "Cost & Traffic Tracking" and "Payment Requests".There are four combinations "Cost & Traffic Tracking" and "Payment Requests":
- Nested campaigns – nested campaigns. An unlimited number of nested campaigns can be created inside the created parent campaign. A payment request for an advertising campaign is made from each nested campaign separately, as well as the creation of posts, the addition of promo codes, the formation of a summary report, the receipt of the promo URL and the offer URL.
- This campaign – this campaign. One main campaign is being created (it is not possible to create nested campaigns), in which the following are available: a payment request, creating posts, adding promo codes, forming a summary report, getting the promo URL and the offer URL.
- Nested campaigns – this campaign. An unlimited number of nested campaigns can be created inside the created parent campaign. The payment for the advertising campaign is requested from the parent campaign and is divided among all the nested ones. Within each nested campaign, the functions of creating posts, adding promo codes, viewing a summary report, getting the promo URL and the offer URL are available.
- This campaign – nested campaigns. An unlimited number of nested campaigns are created inside the created parent campaign. All functions are available for the parent campaign (getting the promo URL and the offer URL, creating posts, adding promo codes, viewing the summary report), except for the payment request. The payment request is made from each nested campaign separately.
Warning
After creating an advertising campaign, you cannot edit combinations.
- Fill in the "Name" field.
- Fill in the "Description" field.
To view the details of the advertising campaign, click on the line of the selected campaign.
Details of the advertising campaign
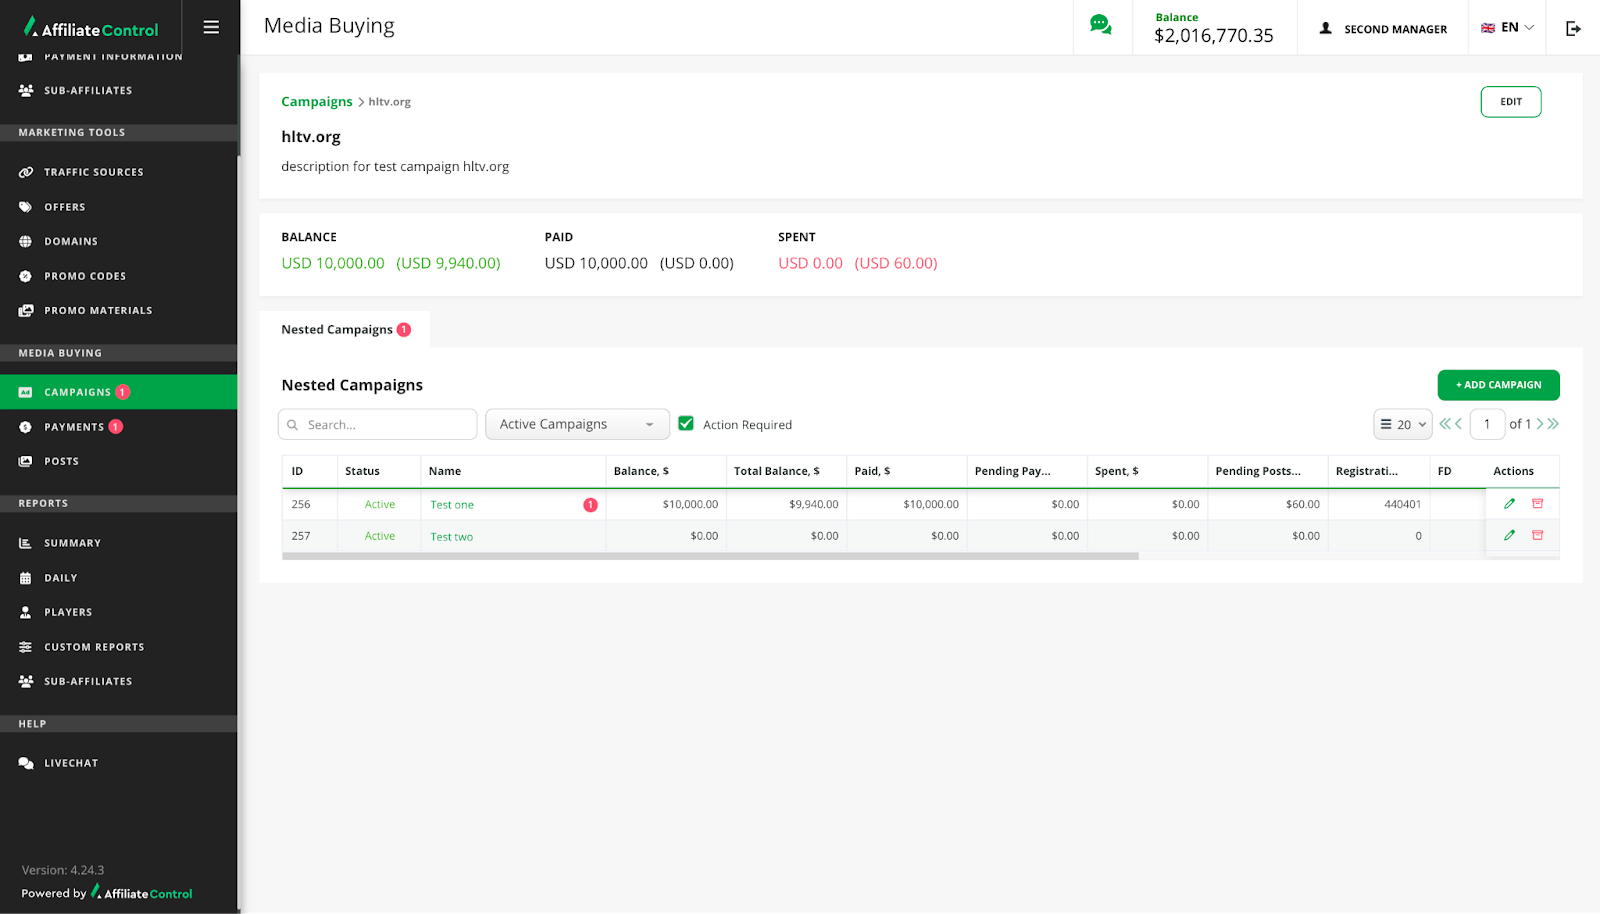
Structurally, the page with the details of the advertising campaign consists of five blocks.
Blocks of campaign details window:
- Chain. For a quick return; by clicking on the links of the chain, an affiliate can quickly move between them.
- Description of the campaign:
- campaign name;
- description of the campaign;
- Buttons block:
- Edit. To edit data about an advertising campaign.
- Get promo URL (the visibility of the button depends on the previously selected combination and may be on a different level).
- Get offer URL (the visibility of the button depends on the previously selected combination and may be at another level).
- Information about the budget of the advertising campaign:
- Balance. Shows the amount that is on the affiliate's balance. The amount in parentheses is the affiliate's balance, taking into account expenses that have not yet passed to the approved status.
- Paid. Shows the amount of all payments made. The amount in parentheses is the payment that is in processing.
- Spent. Shows the amount for which the affiliate has reported. The amount in parentheses is the "spent" amount that is on review.
Warning
By default, the platform shows all amounts in USD. If the payment request is made in a different currency, the platform will convert it at the current exchange rate. In front of the block, a "Details" button will appear, clicking on which the balance in the initially selected currency is visible.
- The block of interaction with campaigns:
- Tabs "Nested campaigns" / "Payments" / "Posts" / "Promo Codes" / "Summary". Depending on the selected combination, tabs can be located at different levels (at the level of the parent campaign / at the level of the nested campaign).
- Tools for interacting with the tab.
- A table with a list of campaigns.
Warning
The Summary tab opens a summary report on the selected campaign and has the following interaction tools:
- Period. Click on the button and select the desired period from the drop-down list.
- Filter. The filter settings are saved until they are reset.
- The "Refresh" button.
Request for payment
The request to pay for an advertising campaign is made from the "Payments" tab. Depending on the campaign, payments can be at different levels (at the level of the parent campaign / at the level of the nested campaign).
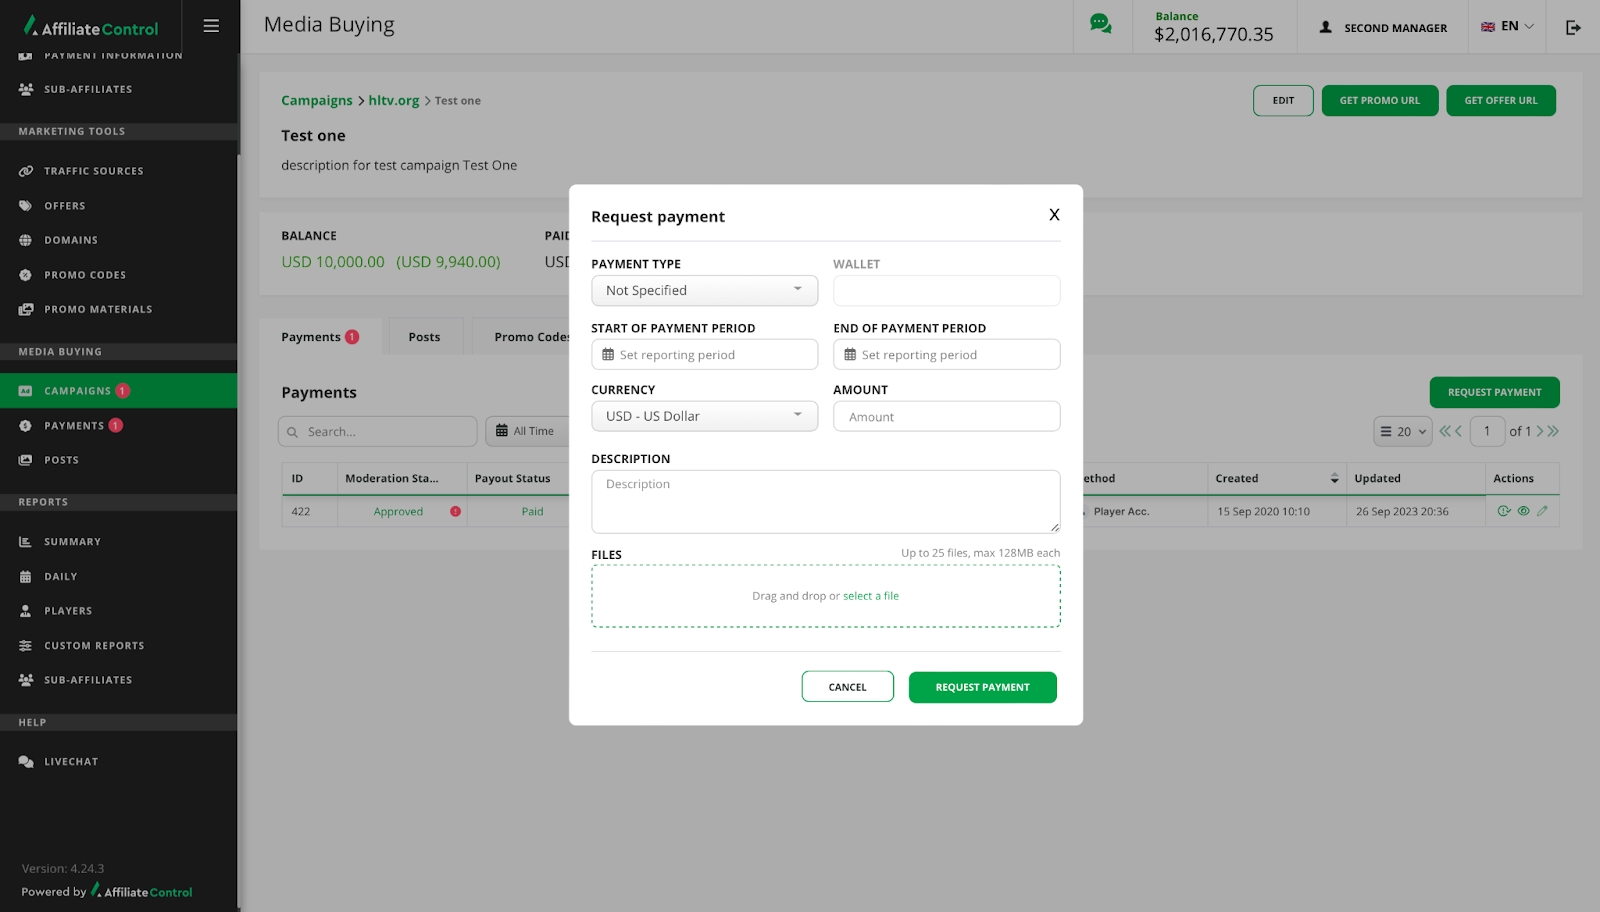
By clicking the "Request payment" button, a pop-up appears to generate a request (the button is placed above the "Number of rows", "Pages" tools).
Fill in the fields following the instructions below:
Select the payment type → specify the wallet number → set the payment period → select the currency for payment → enter the requested amount → add a description → attach the file if necessary → click the "Request payment" button.
Payment requests get into the table with the list of requests.
The following tools are displayed above the table with requests:
- Search. The search works by the payment id.
- Period. Click on the button and select the desired period from the drop-down list.
- Filter. The filter works by moderation status and payment status.
- The "Action required" checkbox. Moves all payments marked as requiring attention to the top of the list.
- The "Request payment" button.
- Number of rows. Setting the number of rows per sheet.
- Pages. Shows which page is open and gives an affiliate the opportunity to switch to another one. Click on the arrow to go to another page. Or enter the page number in the number field.
The list of payments is displayed as a table with the following columns:
- ID. The sorting function is available for the column.
- Moderation status:
- On review. The request has been sent for consideration.
- For rework. The request has not passed moderation, but can be finalized and sent for re-verification.
- Declined. The request has not been verified and can no longer be taken into operation.
- Approved. The request was verified. The status is final.
- Payout status:
- Not paid. Payment changes to this status upon approval.
- For rework. The payment was approved, but was sent for revision.
- In processing. Payment is pending.
- Failed. The payment was rejected by the moderator and can no longer be taken into work.
- Paid. Payment has been made. The status is final.
- Amount. The amount is displayed in the currency that was specified when forming the request. The sorting function is available for the column.
- Period.
- Payment method.
- Created. The date the payment request was created. The sorting function is available for the column.
- Updated. The date of the last update of the payment request. The sorting function is available for the column.
- Actions:
- Mark as read/unread.
- Show. Opens a popup with payment details and a comment window. The comment can be edited within 24 hours.
- Edit. The button is active for payments that are in the "For rework" status. When clicked, a pop-up will open. Structurally, the pop-up consists of two blocks:
- Comment. Comment from the moderator and a field for making your comment (can be edited within 24 hours).
- Settings for generating a payment request.
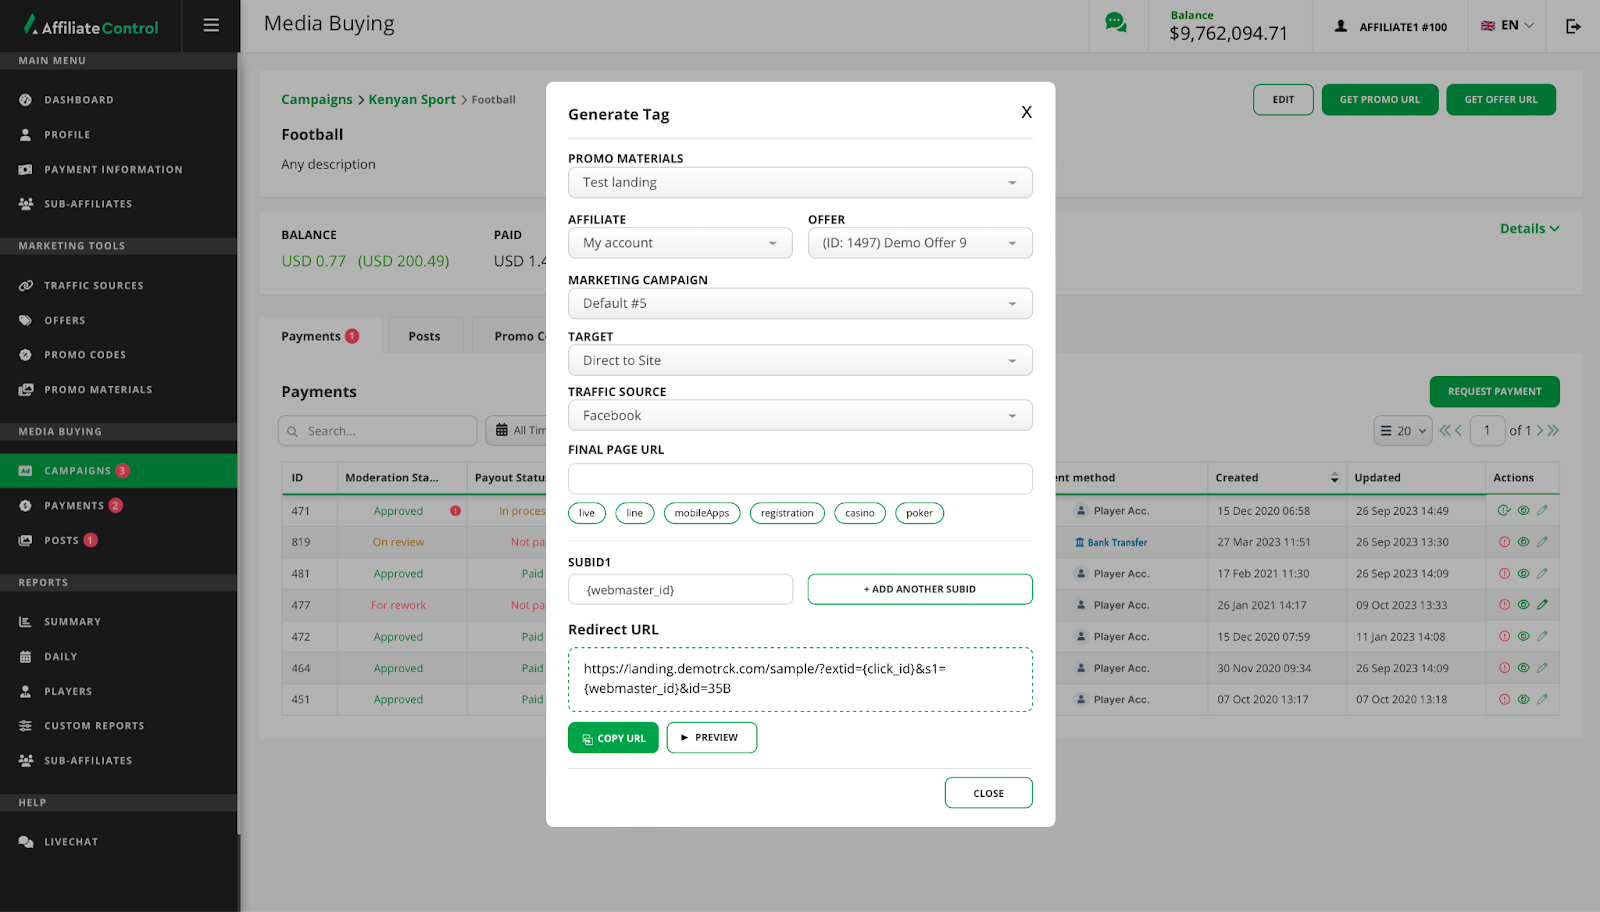
Getting a link for an advertising campaign
Unique links for promo materials and offers are generated for each advertising campaign. The buttons for creating links are placed either at the main campaign level or at the nested campaign level, depending on the type of campaign created.
The process of creating a link to an offer and promo material is almost identical. There is a difference only for creating a code for a promo material of "Banner" type (image size selection is added).
To get a link for the promo material, follow the instructions below:
Click the "Get promo url" button → select a brand (the field is available if more than one brand is assigned to the affiliate) → select the type of promotional material: landing / banner (for the "Banner" type, the link will be replaced with a code) → select for whom the link / code is generated → select an offer → select a marketing campaign (the list is available if more than one rotation group is assigned to the affiliate) → select the target → for the "Banner" type, select the image size → select the language (language selection is available if several languages are specified on the promo material) → select the traffic source → manually enter the final url without a domain or select from the suggested (action optional) → add a sub id, to do this, click "Add another ID" (optional action) → click "Copy URL" / "Copy code".
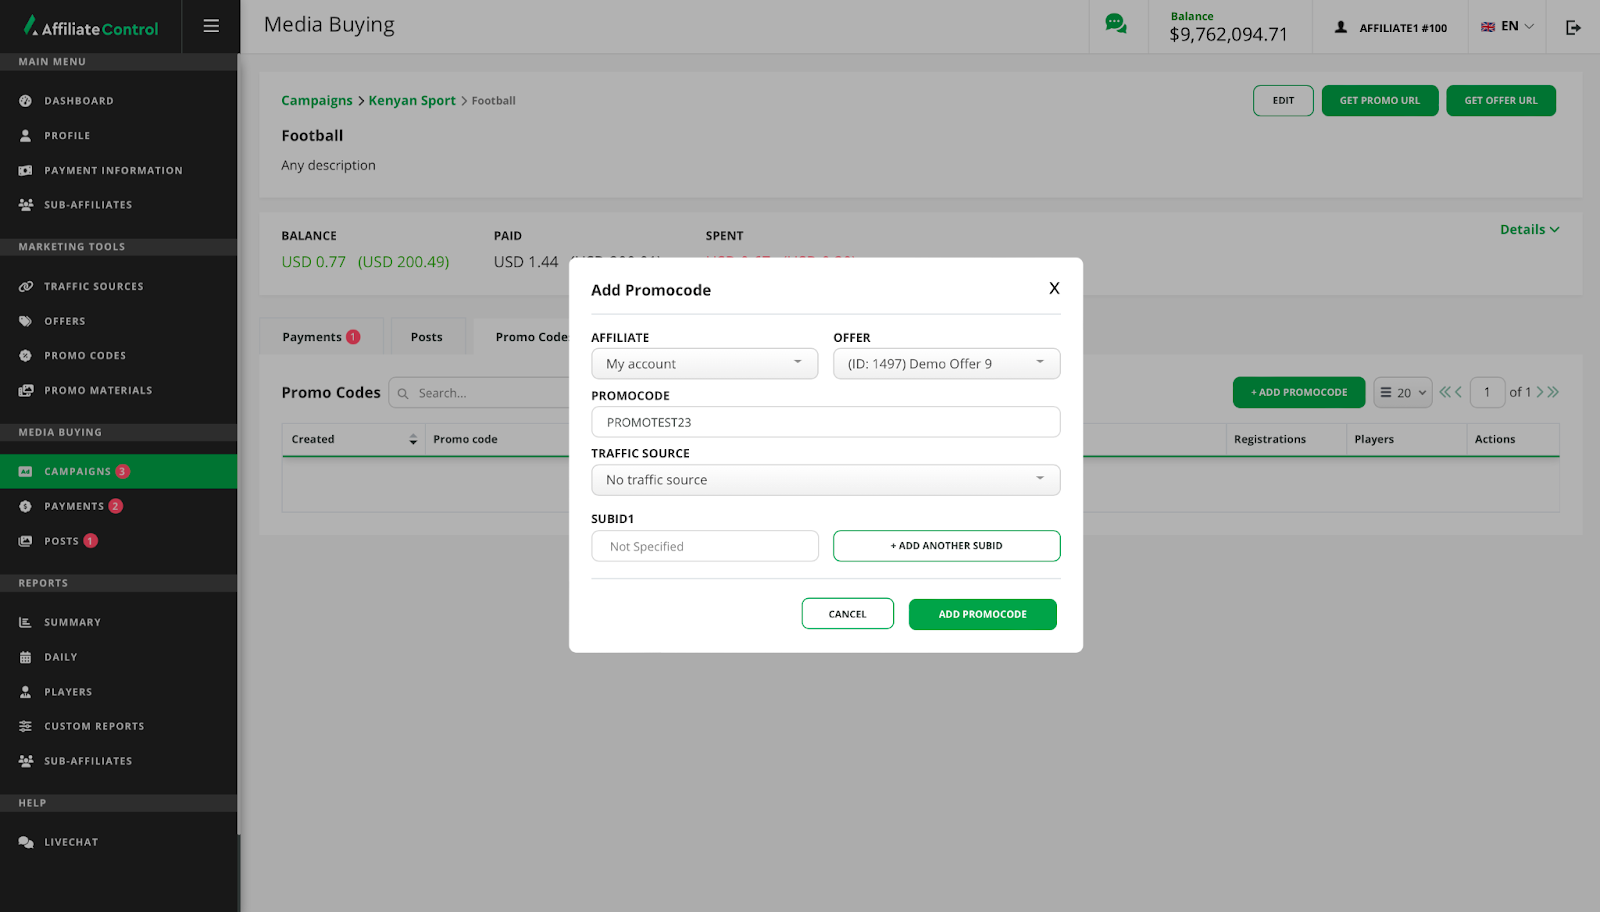
Adding promo codes
An affiliate can add promo codes for an ad campaign on the "Promo Codes" tab. The tab is placed either at the main campaign level or at the nested campaign level, depending on the type of campaign created.
Each promo code is linked to a specific offer, so the affiliate can create several promo codes for one offer within the selected advertising campaign.
By clicking the "Add promocode" button, a pop-up for creating a promo code appears (the button is placed next to the "Number of rows", "Pages" tools).
Fill in the fields following the instructions:
Click "Add promocode" → select an affiliate → in the "PromoCode" field, enter the name of the promo code → select the offer to which you want to attach the promo code → select the traffic source, if necessary → add a sub id, if necessary → click "Add promocode".
The created promo codes are included in the list below.
The following tools are displayed above the list of promo codes:
- Search. The search works by the name of the promo code.
- The "Add promocode" button.
- Number of rows. Setting the number of rows per sheet.
- Pages. Shows which page is open and gives an affiliate the opportunity to switch to another one. Click on the arrow to go to another page. Or enter the page number in the number field.
The list of promo codes is displayed as a table with the following columns:
- Created. The date the promo code was created. The sorting function is available for the column.
- Promo code. Use the "Copy" button next to the promo code name to copy the promo code.
- Affiliate.
- Registrations. The number of registrations made using the promo code. The sorting function is available for the column.
- Players. The number of players who have performed an action. The sorting function is available for the column.
- Actions:
- Statistics. O pens a custom report with a filter by promo code.
- Edit. Click to change the offer / affiliate / traffic source / sub id. You cannot change the promo code itself.
- Delete.
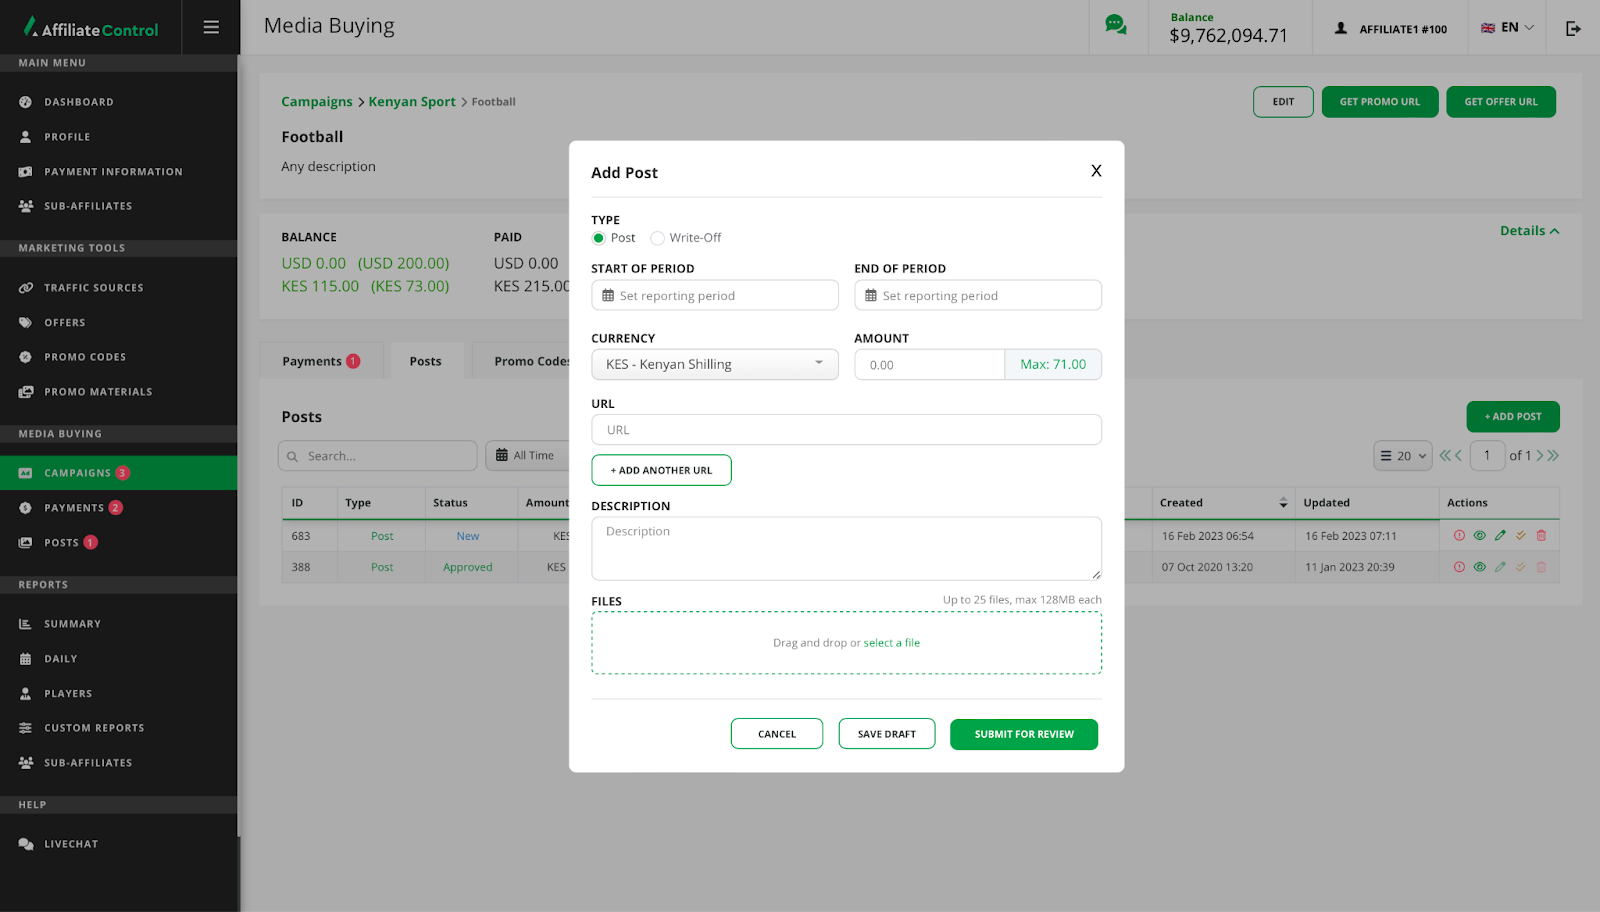
Creating a posts
For reporting on the funds allocated for the advertising campaign, the "Posts" tab is provided. The tab is placed either at the main campaign level or at the nested campaign level, depending on the type of campaign created.
By clicking the "Add post" button, a pop-up for adding a publication appears (the button is placed above the "Number of rows", "Pages" tools).
Fill in the fields following the following instructions:
Select the type of post (post / write-off) → specify the period for which the report is generated (the end of the period should not be more than the current day) → specify the currency → enter the amount spent → enter the URL (optional field) → fill in the "description" field → attach files (optional field) → click "Submit for review" or "Save draft" (in this case, the post is not sent for review and it can be reworked).
Warning
The "Post" type is used for a report on the material actually published.
The "Write-off" type is used to write off funds when money has been spent, but it is not possible to report the results (for example, when the advertising platform failed to fulfill its obligations).
Posts go to the list in the table below.
The following tools are displayed above the list of posts:
- Search. The search works by the id.
- Period. Click on the button and select the desired period from the drop-down list.
- Filter. The filter works by the type and status of the posts.
- The "Action required" checkbox. Moves all posts marked as requiring attention to the top of the list.
- The "Add post" button.
- Number of rows. Setting the number of rows per sheet.
- Pages. Shows which page is open and gives an affiliate the opportunity to switch to another one. Click on the arrow to go to another page. Or enter the page number in the number field.
The list of post is displayed as a table with the following columns:
- ID. The sorting function is available for the column.
- Type (publication/ write-off).
- Status:
- New. The post has not yet been submitted for review and it can be edited.
- On review. The post is on review.
- For rework. The post was sent by the moderator for rework.
- Declined. The post was rejected by the moderator and can no longer be reworked. The status is final.
- Approved. The post was approved. The status is final.
- Amount. The costs for which the affiliate reports. The sorting function is available for the column.
- Period.
- URL’s.
- Created . Date the post was created. The sorting function is available for the column.
- Updated. The date of the last update. The sorting function is available for the column.
- Actions:
- Mark as read/unread.
- Show. Opens a popup with the details of the post and a window for adding a comment. The comment can be edited within 24 hours.
- Edit. The button is active for posts that are in the "New" and "For rework" status. When clicked, a pop-up will open. Structurally, the pop-up consists of two blocks:
- Comments. Comments from the moderator and a field for making your comment (can be edited within 24 hours).
- Settings for creating a post.
- Submit for review. The button is available for publications with the status "New" and "For rework".
- Delete.
