The "Media Buying" section is a tool for affiliate managers that allows them to request a budget for advertising campaigns, track statistics and report on spent funds.
Campaigns
In this subsection you can create a campaign and find the entire list of campaigns for which you have requested payments before.
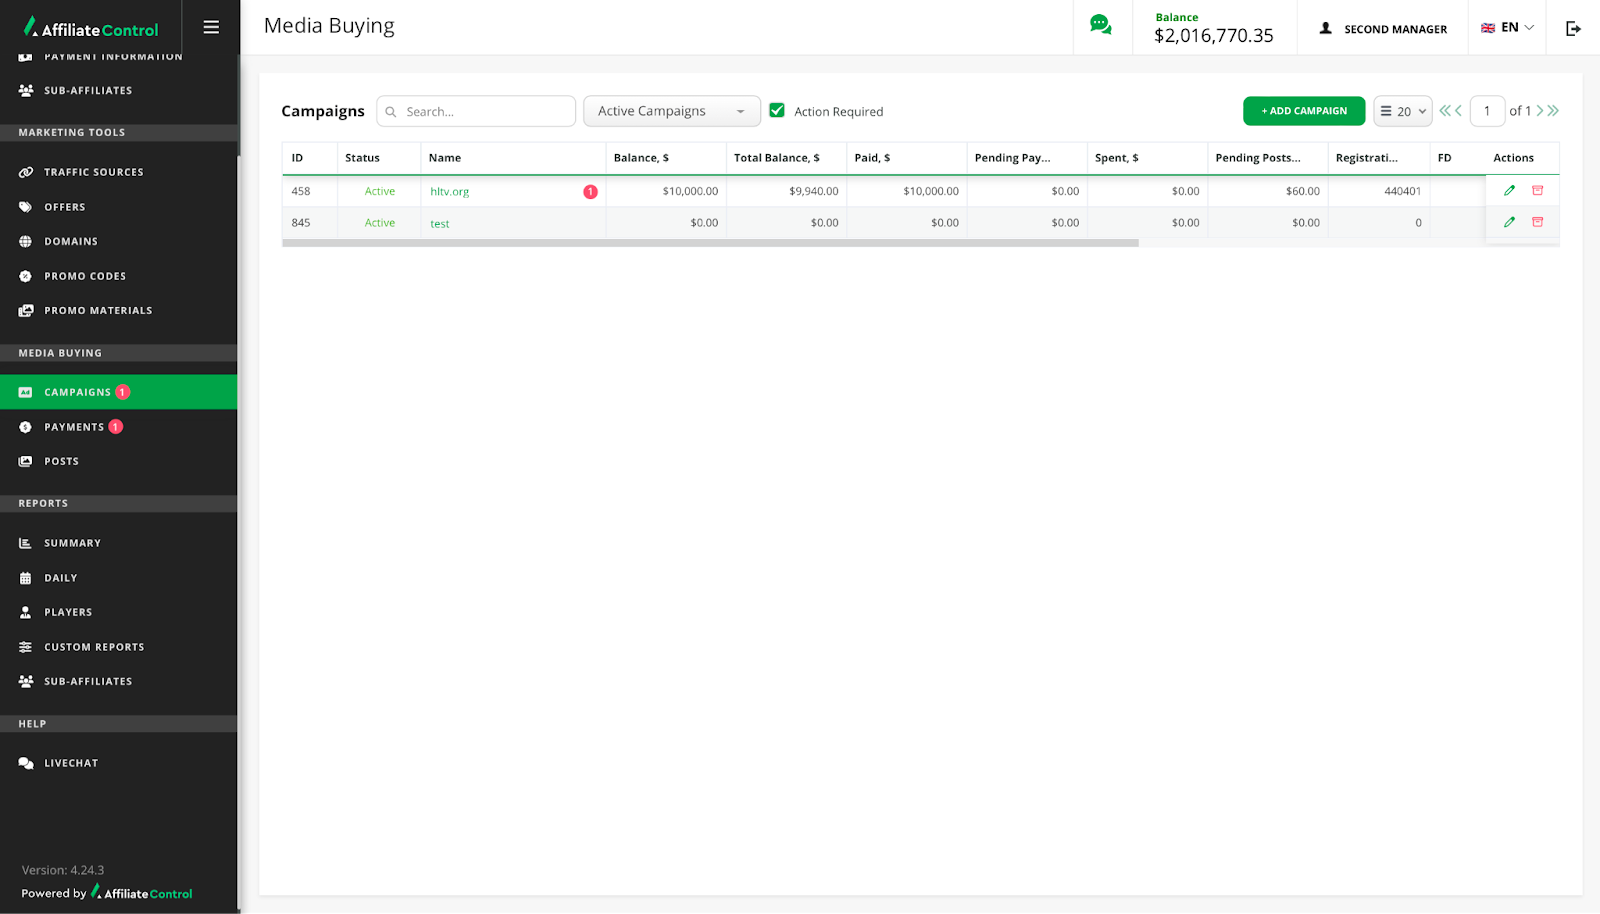
Depending on the settings the campaign can be a root campaign or root campaign with nested campaign.
Within campaign you can see tabs for interaction:
- Payments. The tab for creating a budget request for an advertising campaign.
- Posts. The tab where the affiliate reports on spending.
- Promo codes. The tab for creating the promo codes.
- Summary. The tab with a report about activity of the advertising campaign.
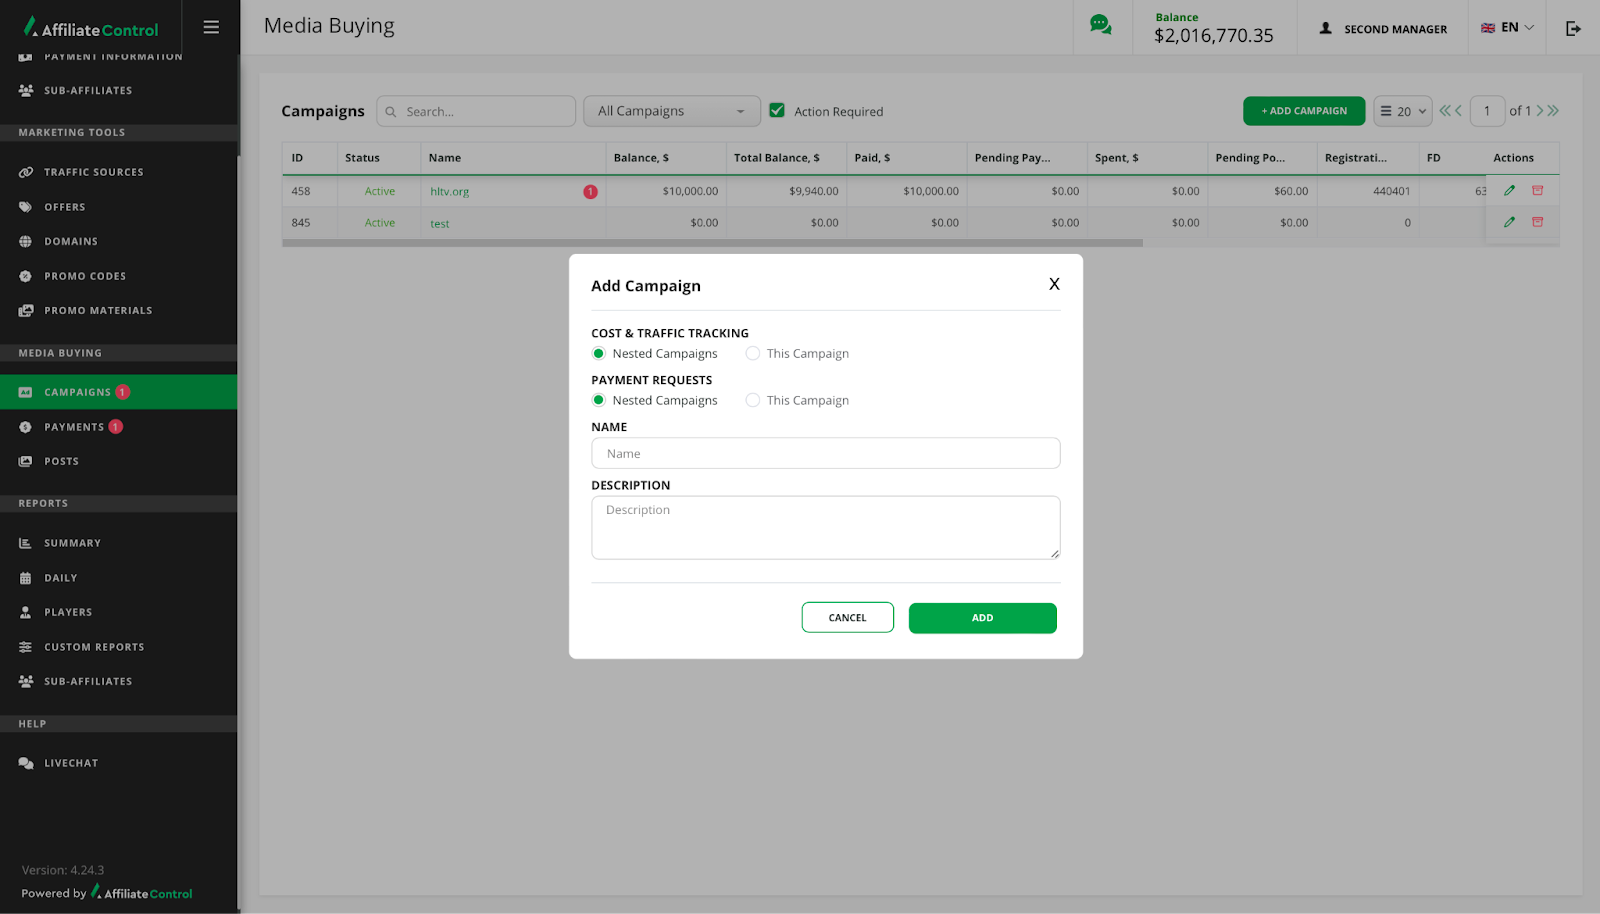
Campaign creation
To create a campaign, click on "Add campaign" button and then follow the steps below:
- Select at which level "Cost & Traffic tracking" should occur.
- Nested campaign — posts, promo codes, promo URL, offer URL, summary report are created separately for each nested campaign.
- This campaign — posts, promo codes, promo URL, offer URL, summary report are created only at the root campaign level and are used for all nested campaigns, if they are created.
- Select at which level "Payment requests" should occur.
- Nested campaign — a payment request is created for each nested campaign separately.
- This campaign — a payment request is created only for the root campaign and the balance is shared between all nested campaigns, if they are created.
- Fill in the "Name" field.
- Fill in the "Description" field.
- Click the "Add" button.
Warning
After the advertising campaign is created, you cannot edit selected checkboxes in the "Cost & Traffic tracking" and "Payment requests".
Click on the row with the created campaign to continue the interaction with it.
Payment request
You need to request the payment for an advertising campaign. A payment request is formed in the "Payment" tab. Depending on the campaign type, payments can be at the root campaign level or at the nested campaign level.
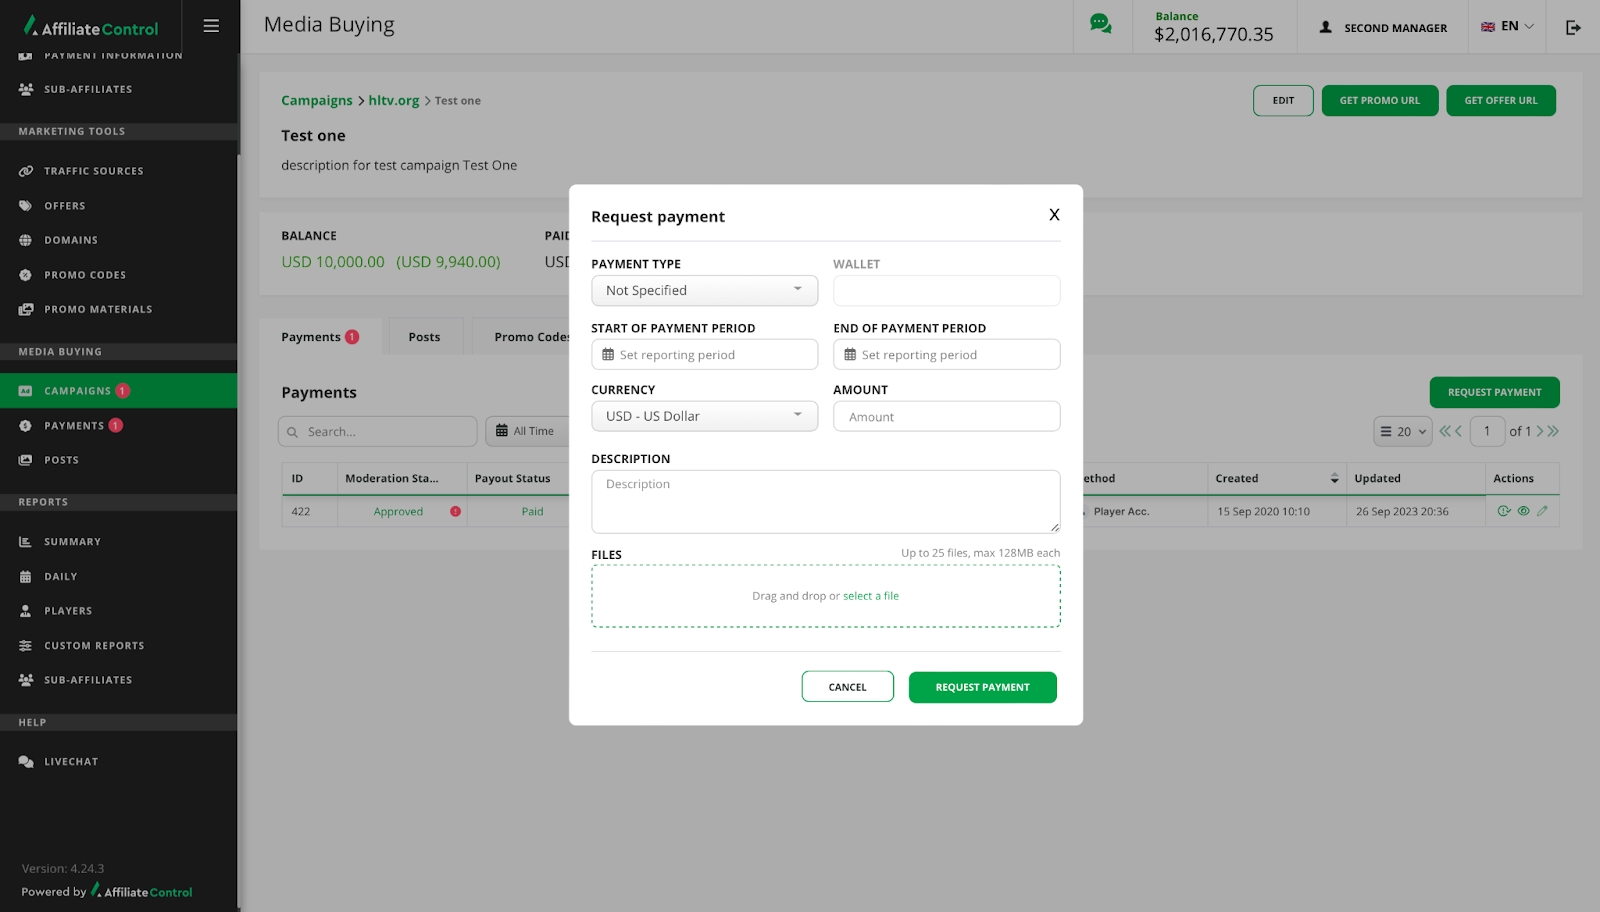
To create a payment request, click "Request payment" button and follow the instruction below:
- Select a payment type.
- Enter the wallet number.
- Set the payment period.
- Select the currency for the payment.
- Enter the requested amount.
- Enter a URL (e.g., the advertising platform's URL).
- Add the description.
- Attach a file (optional).
- Click the "Request payment" button.
The request gets moderation status and payout status instantly after creation.
Moderation statuses:
- On review. The request was sent for review.
- For rework. The request cannot be approved and sent for rework.
- Declined. The request was declined. The status is final.
- Approved. The request was approved. The status is final.
Payout statuses:
- Not paid. The payment receives this status after creation.
- For rework. The request is approved at the moderation stage, but sent for rework at the payout stage.
- In processing. The payment is pending.
- Failed. The payment was rejected by the moderator. The status is final.
- Paid. The payment was made. The status is final.
Warning
You can edit a payment request in the "For rework" status within the campaign or in the Payments subsection.
Campaign budget information
All requested funds and campaign spendings are displayed in a table. Within the campaign, this information is displayed in a separate block.
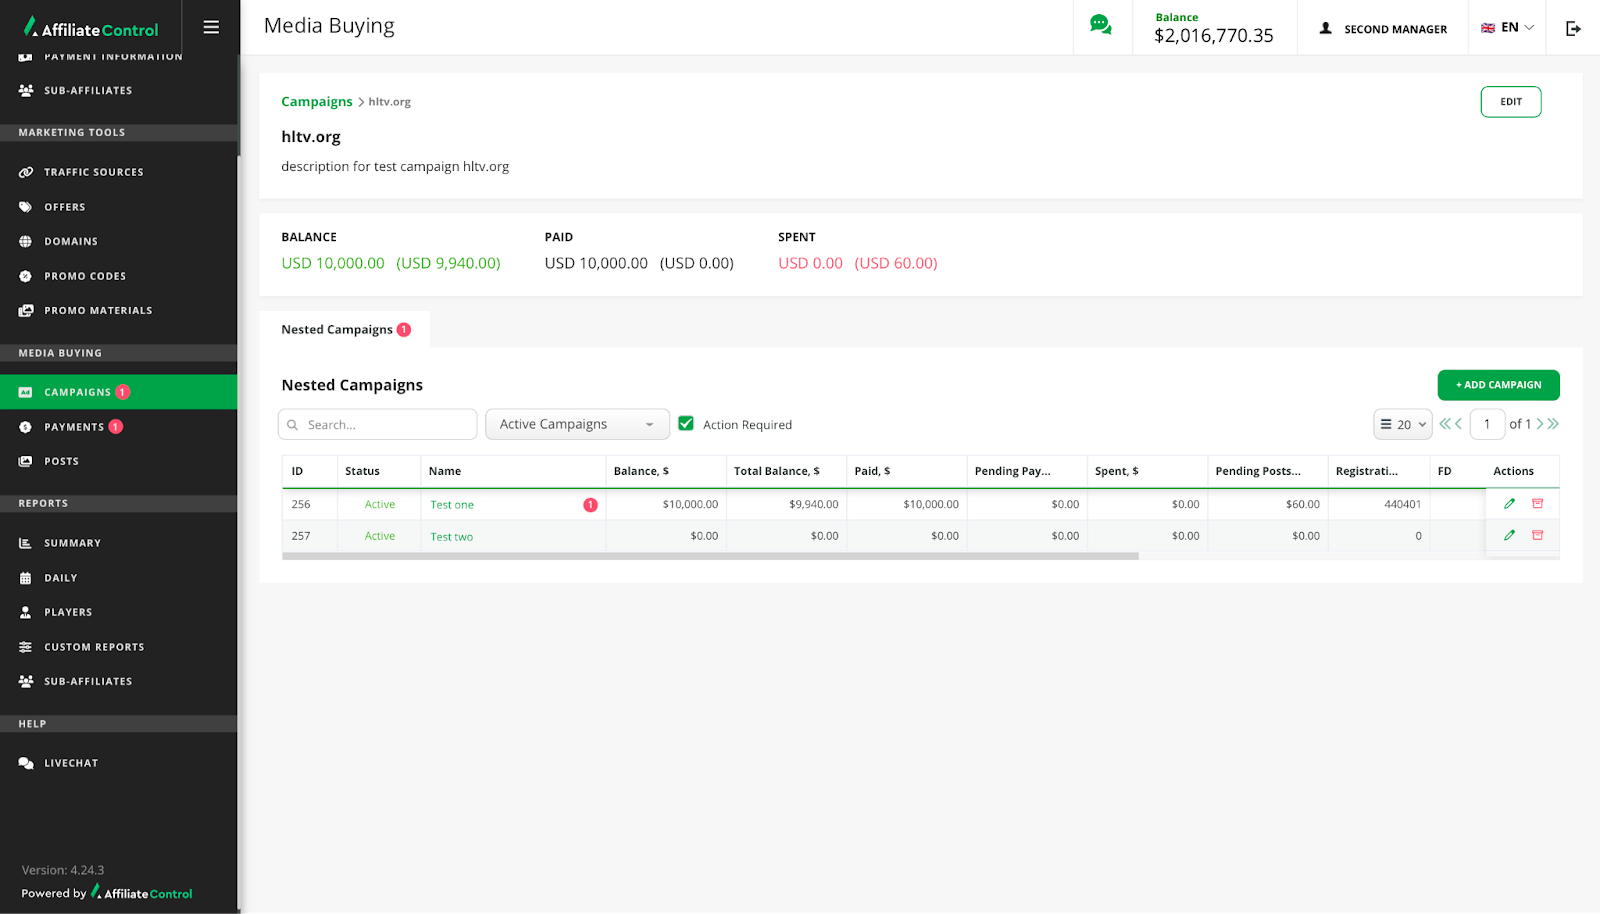
The block with information about the campaign budget is divided into three sections:
- Balance. Shows the amount that is on the affiliate's balance. The amount in brackets is the affiliate's balance including all payments and spendings.
- Paid. Shows the sum of all payments made. The amount in brackets is the sum of all payments in process.
- Spent. Shows the amount for which the affiliate has reported. The amount in brackets is the amount of spending that is in process.
Warning
By default, all amounts are shown in USD. If a payment request is generated in another currency, it will be converted at the current exchange rate. Click the "Details" button in the block with information about the campaign budget to see the amounts in the originally selected currency.
Promo URL and Offer URL to track traffic
To link a player registration to your campaign, you can create unique tracking links for the promo materials or the offers.
The buttons to create URLs are placed at the root campaign level or at the nested campaign level, depending on the type of campaign.
Offer URL creation
To create an offer link, click on the "Get Offer URL" button.
The URL generation form can contain the following fields:
- Affiliate: affiliate, for whom the link will be created. You can select a sub-affiliate's account or your own.
- Offer: offer, to which players will be linked during registration on the product's website.
- Brand: site, to which traffic will be directed. The field is available if more than one brand is assigned to your account.
- Marketing campaign: campaign (domain rotation group). Field is available if more than one domain rotation group (dedicated or public) has been added to your account by admin.
- Target: site section, to which you want to redirect traffic.
- Traffic source: optional. Select a traffic source if you want to use the postbacks configured for it.
- Final page URL: optional. The URL part that directs to the redirect endpoint. For example, you selected "Target" = "Direct to site" and "Final Page URL" = "/live". In this case, the traffic will be redirected to https://example.com/live, where the actual site domain will be used instead of example.com.
- SubID: optional. SubIDs are used to transmit additional traffic attributes that can be used later for filtering in reports. They can be filled in automatically from the traffic source settings.
The generated link will be displayed in the "Your Tracking URL" block.
Landing URL creation
To create a landing link, click on the "Get Promo URL" button.
The Landing URL generation form can contain the following fields:
- Promo materials: list of all promo materials available for your account. Select a promo material landing.
- Affiliate: affiliate, for whom the link will be created. You can select a sub-affiliate's account or your own.
- Offer: offer, to which players will be linked during registration on the product's website.
- Brand: site, to which traffic will be directed. The field is available if more than one brand is assigned to your account.
- Marketing campaign: campaign (domain rotation group). Field is available if more than one domain rotation group (dedicated or public) has been added to your account by admin.
- Target: the site section, to which you want to redirect traffic.
- Language: the language that is displayed on the landing page when the user visits it. It can be determined automatically based on the system settings of the user's operating system or can be set.
- Final page URL: optional. The URL part that directs to the redirect endpoint. For example, you selected "Target" = "Direct to site" and "Final Page URL" = "/live". In this case, the traffic will be redirected to https://example.com/live, where the actual site domain will be used instead of example.com.
- Traffic source: optional. Select a traffic source if you want to use the postbacks configured for it.
- SubID: optional. SubIDs are used to transmit additional traffic attributes that can be used later for filtering in reports. They can be filled in automatically from the traffic source settings.
The generated link will be displayed in the "Redirect URL" block.
Generating a code for placing a banner on the site
To create a banner code, click on the "Get Promo URL" button.
The banner code generation form can contain the following fields:
- Promo materials: list of all promo materials available for your account. Select a promo material banner.
- Affiliate: affiliate, for whom the banner code will be created. You can select a sub-affiliate's account or your own.
- Offer: offer, to which players will be linked during registration on the product's website.
- Brand: site, to which traffic will be directed. The field is available if more than one brand is assigned to your account.
- Marketing campaign: campaign (domain rotation group). Field is available if more than one domain rotation group (dedicated or public) has been added to your account by the admin.
- Target: the site section to which you want to redirect traffic.
- Size: the banner might have several sizes available for posting, such as 460x60 and 728x90.
- Language: the language that is displayed on the landing page when the user visits it. It can be determined automatically based on the system settings of the user's operating system or can be set.
- Final page URL: optional. The URL part that directs to the redirect endpoint. For example, you selected "Target" = "Direct to site" and "Final Page URL" = "/live". In this case, the traffic will be redirected to https://example.com/live, where the actual site domain will be used instead of example.com.
- Traffic source: optional. Select a traffic source if you want to use the postbacks configured for it.
- SubID: optional. SubIDs are used to transmit additional traffic attributes that can be used later for filtering in reports. They can be filled in automatically from the traffic source settings.
When all the steps are completed you will be shown the code to place the banner on the site.
Promo code for advertising campaign
Using certain channels of engagement, placing tracking URLs may not be possible. In such cases you can generate and provide players with a promo code. Using this promo code during registration, players will be linked to the affiliate's account.
The button for creating promo code is placed at the root campaign level or at the nested campaign level, depending on the type of campaign.
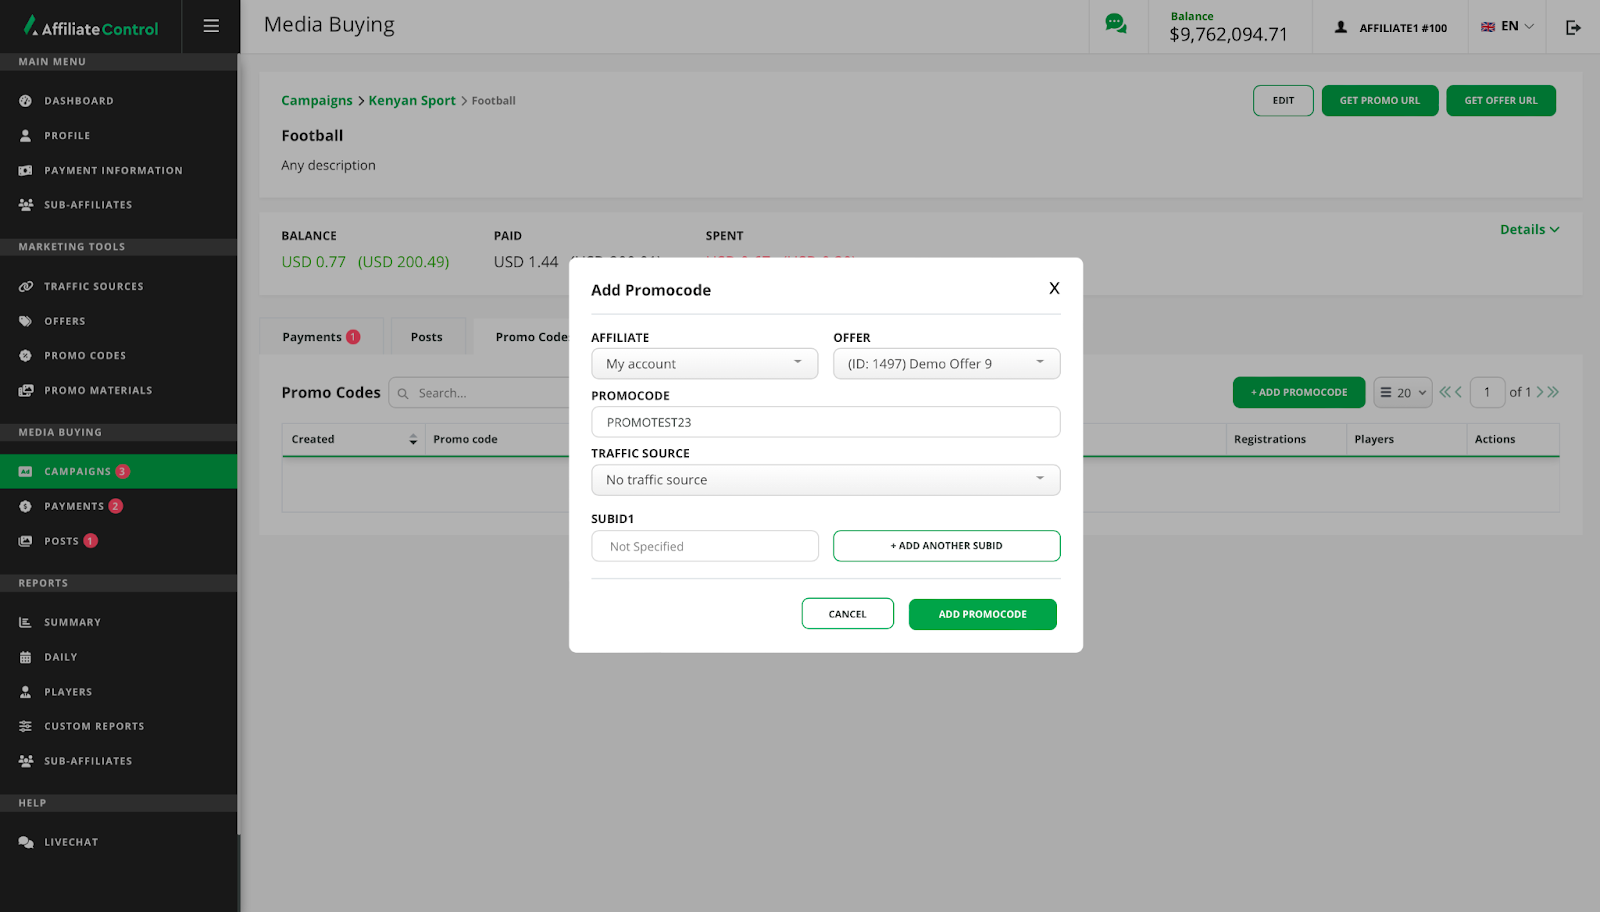
Promo code creation
- Click the "Promo Codes" tab.
- Click the "Add promo code" button.
- Select the affiliate account for which the promo code will be created. You can choose a sub-affiliate account or your own.
- Select the offer to which you want to add the promo code.
- In the "PromoCode" field, enter the name of the promo code (may contain capital letters of the English alphabet and numbers).
- Select the traffic source (optional): you can specify the desired traffic source to send notifications about actions performed via postbacks.
- Add sub id (optional): parameters can contain arbitrary data; usually used for ease of reading and filtering statistics.
- Click "Add Promocode".
Report on the funds allocated for the advertising campaign
The "Posts" tab is used for creating a post in which you report on previously requested funds for an advertising campaign. The tab is placed at the root campaign level or at the nested campaign level, depending on the campaign type.
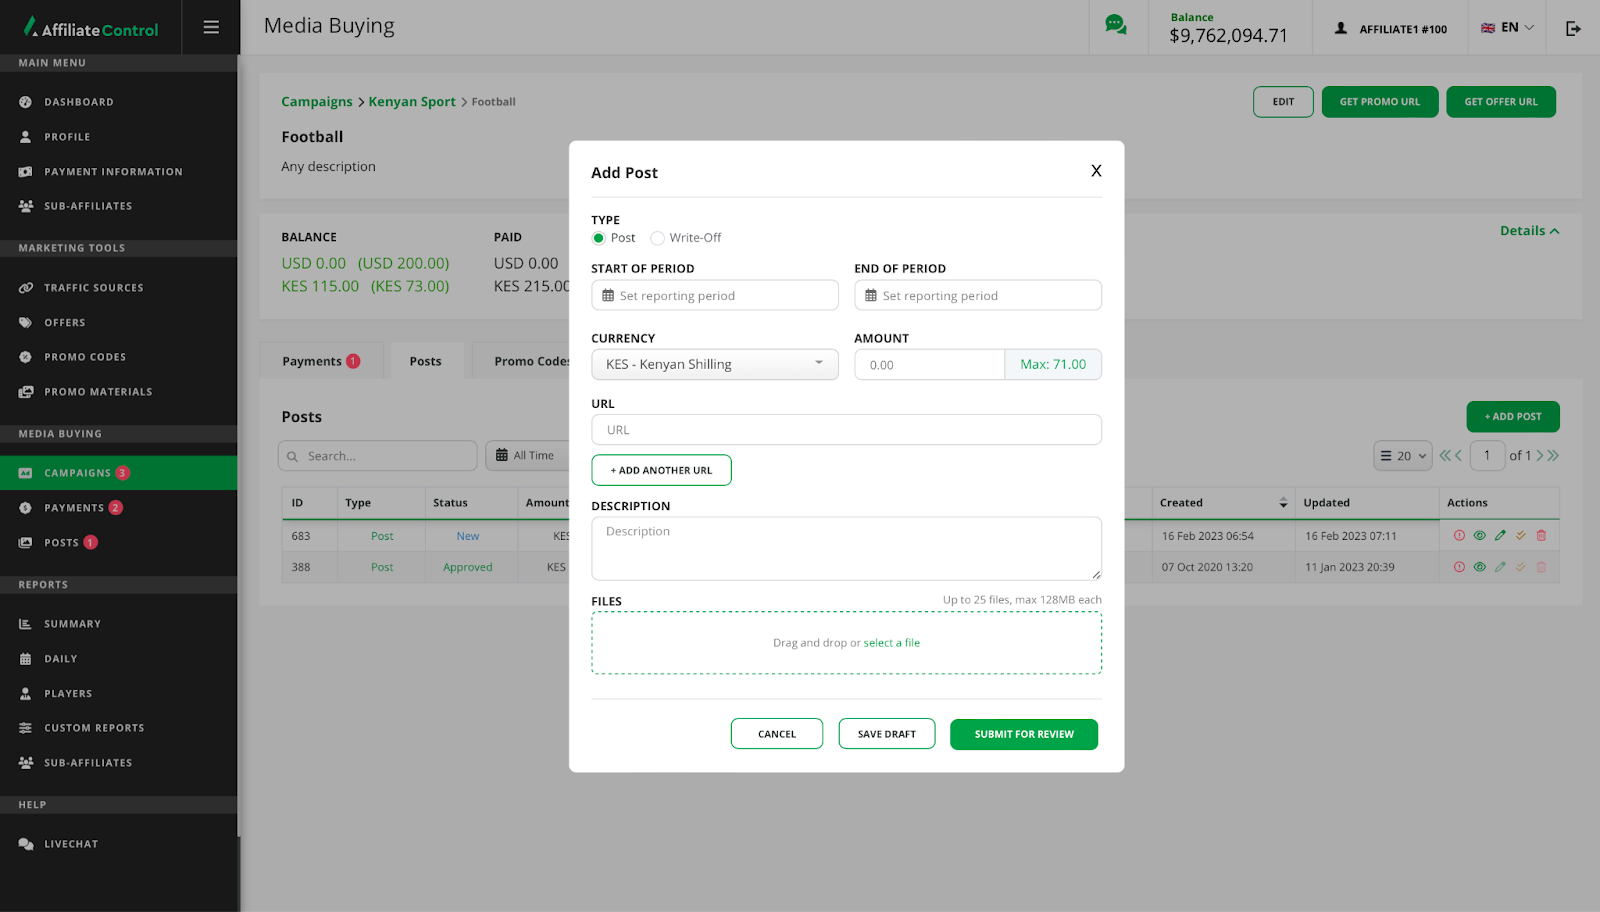
Creating a post
- To create a post, click the "Add Publication" button.
- Select the post type. Use the "Post" type to report spending on actual published material. Use the "Write-off" type to report for spending that cannot be reported (for example, when an advertising platform did not fulfill its responsibilities).
- Specify the period for which the report is generated (the maximum value at the end of the period is the current day).
- Specify the currency.
- Enter the amount of spending.
- Enter the URL that was used to engage players. Optional.
- Fill in the "Description" field.
- Attach files. Optional.
- Click "Submit for review". You can save the post as a draft so that you can finalise and submit it later. To do this, click the "Save draft" button.
When a post is created, it can have the following statuses:
- New. Post saved as a draft and not yet submitted for review. The post can be edited.
- On review. The post is on review.
- For rework. The post was sent by the moderator for rework.
- Declined. The post was rejected by the moderator and can no longer be reworked. The status is final.
- Approved. The post was approved. The status is final.
Warning
You can edit a post in the "For rework" status within the campaign or in the Posts subsection.