Traffic sources
Using multiple attraction channels, you can create several traffic sources in your dashboard. With their help, you will be able to separate statistics for each source in reports. Setting up traffic sources is also mandatory if you need to set up postbacks.
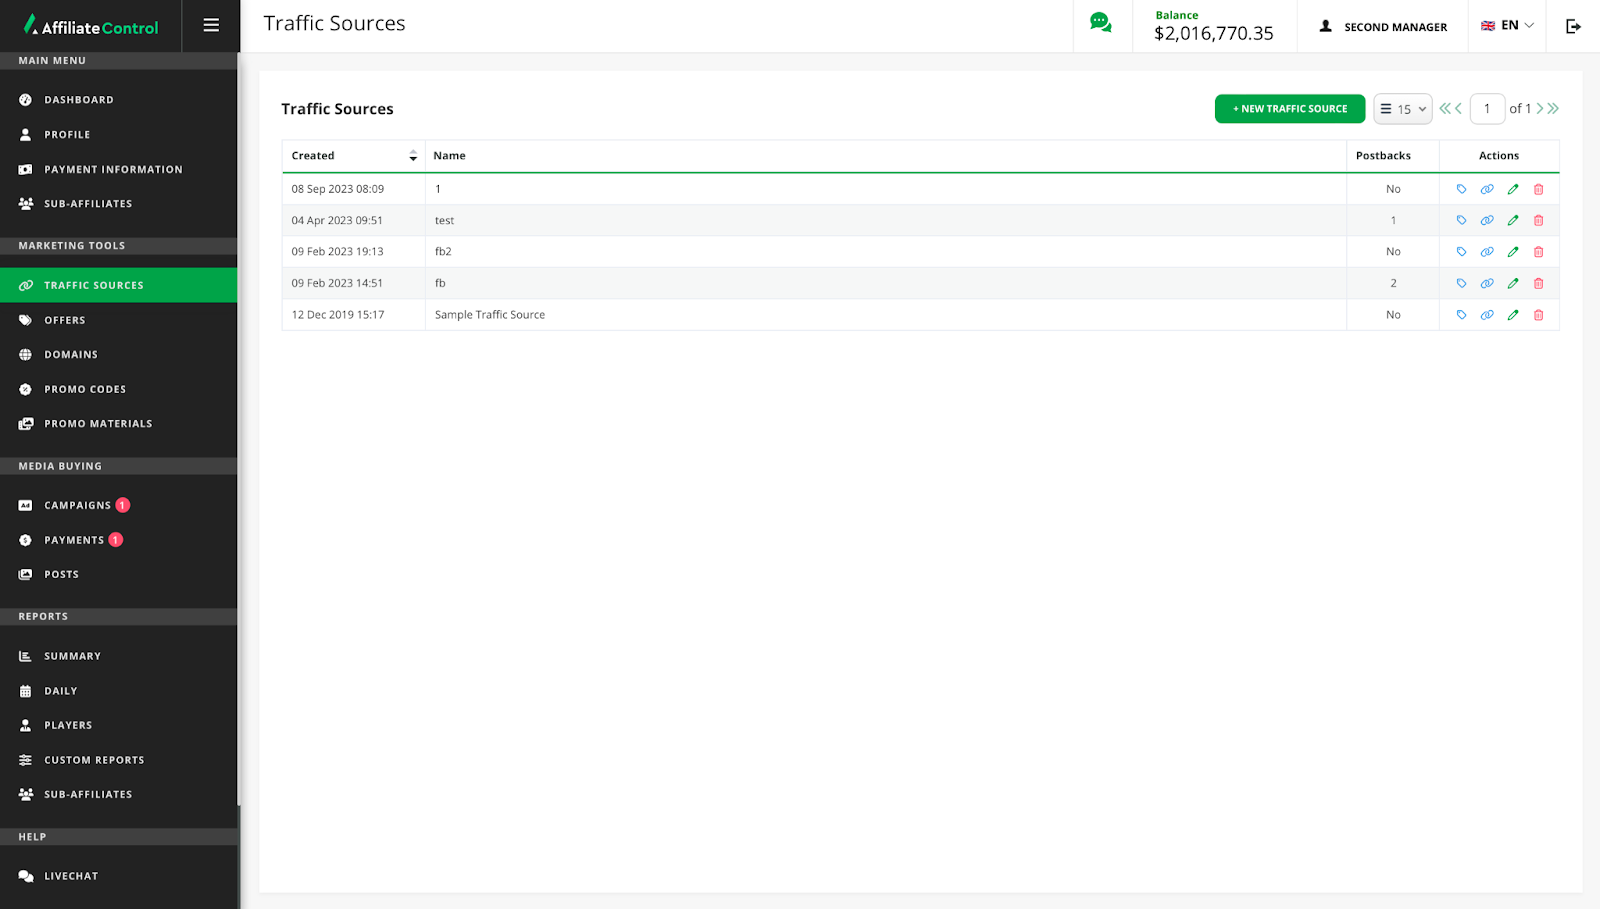
Traffic source management
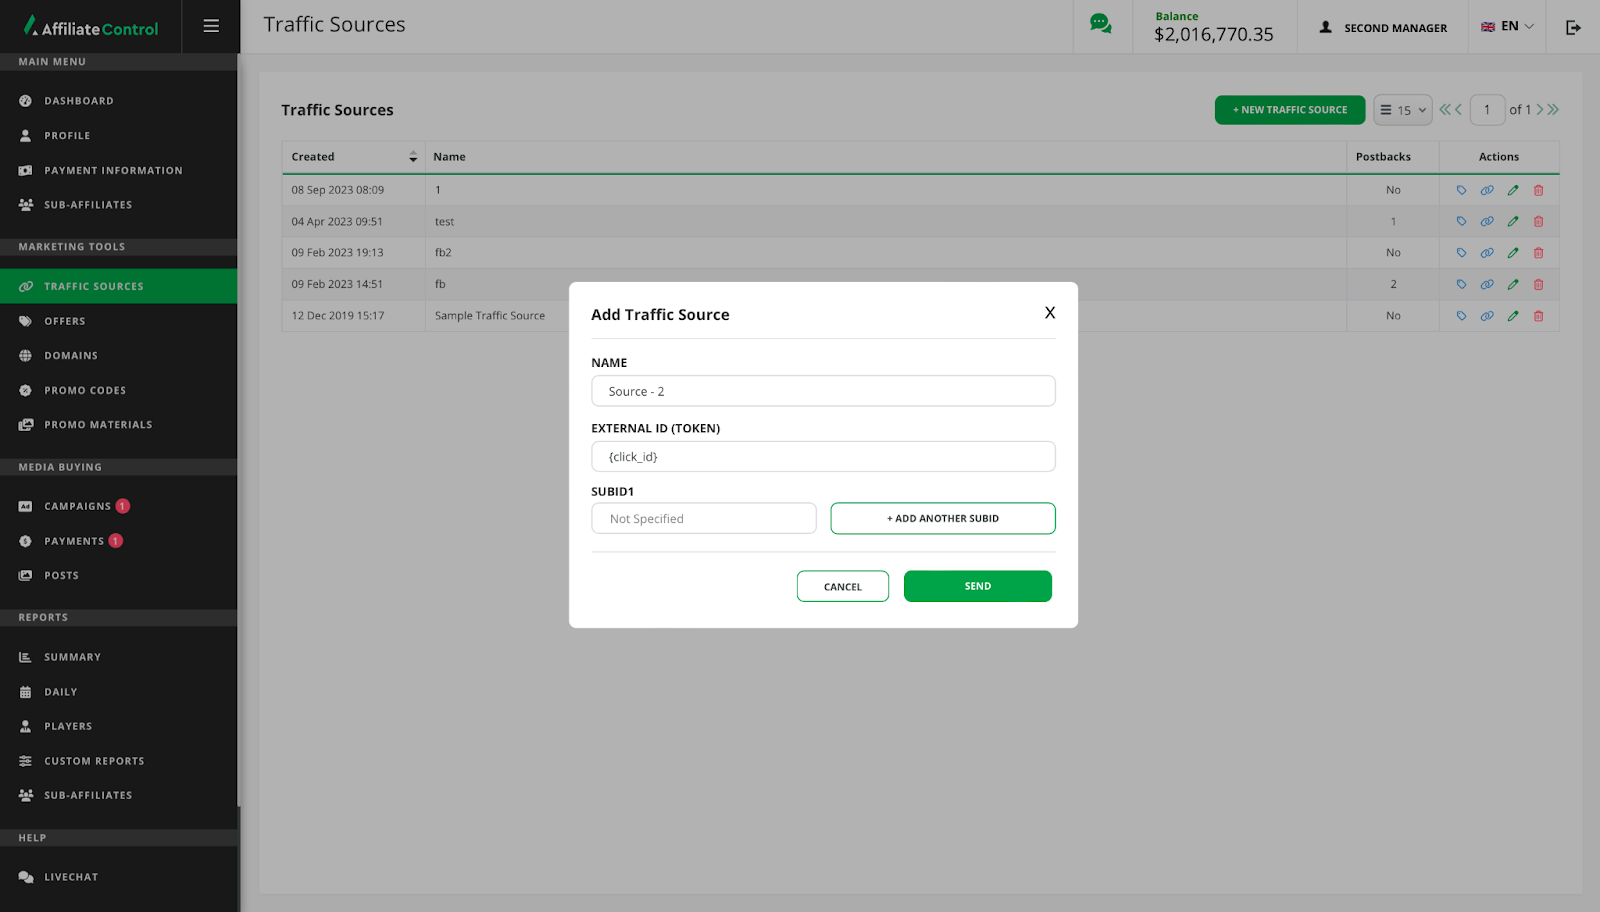
To create a new traffic source fulfill the following fields:
- Name: used to identify the traffic source in reports.
- External ID: traffic source macro to substitute a transition identifier, such as
{click_id}. Please contact the traffic source support team to ensure that this parameter is filled in correctly. - SubID: in addition, you can specify up to five SubID parameters. For instance, the webmaster ID macro from a traffic source.
Postbacks
The affiliate program has the ability to use postbacks to inform traffic sources about certain player events.
Notifications are an HTTP or HTTPS GET or POST request to the URL specified in the settings.
The request will be considered successful if the 200 OK code is returned in response.
In case of failure, the request will be repeated up to 5 times. Consider using a {requestId} macro to avoid duplicate notifications.
How does postback tracking work?
The traffic source, redirecting visitors to the tracking link or landing, should be able to assign a unique identifier (External ID) to each transition.
This identifier should be substituted in the GET parameter extid of the tracking link.
There is no need to do this manually - it is enough to configure the traffic source in the account.
Thus, a connection is formed between the External ID and the player on the site.
When a player performs actions on the site, the affiliate program checks which traffic source the player came from.
If the traffic source exists and postbacks are configured for it, the event type is checked for compliance with the selected types in the postback settings, macros are replaced in the postback URL and attempts are made to send a request to the traffic source.
In order to identify which of the visitors sent by the source fulfilled the terms of the offer, the affiliate program can supply an External ID to the postback URL.
It is contained in the {extid} macro.
Postback setting
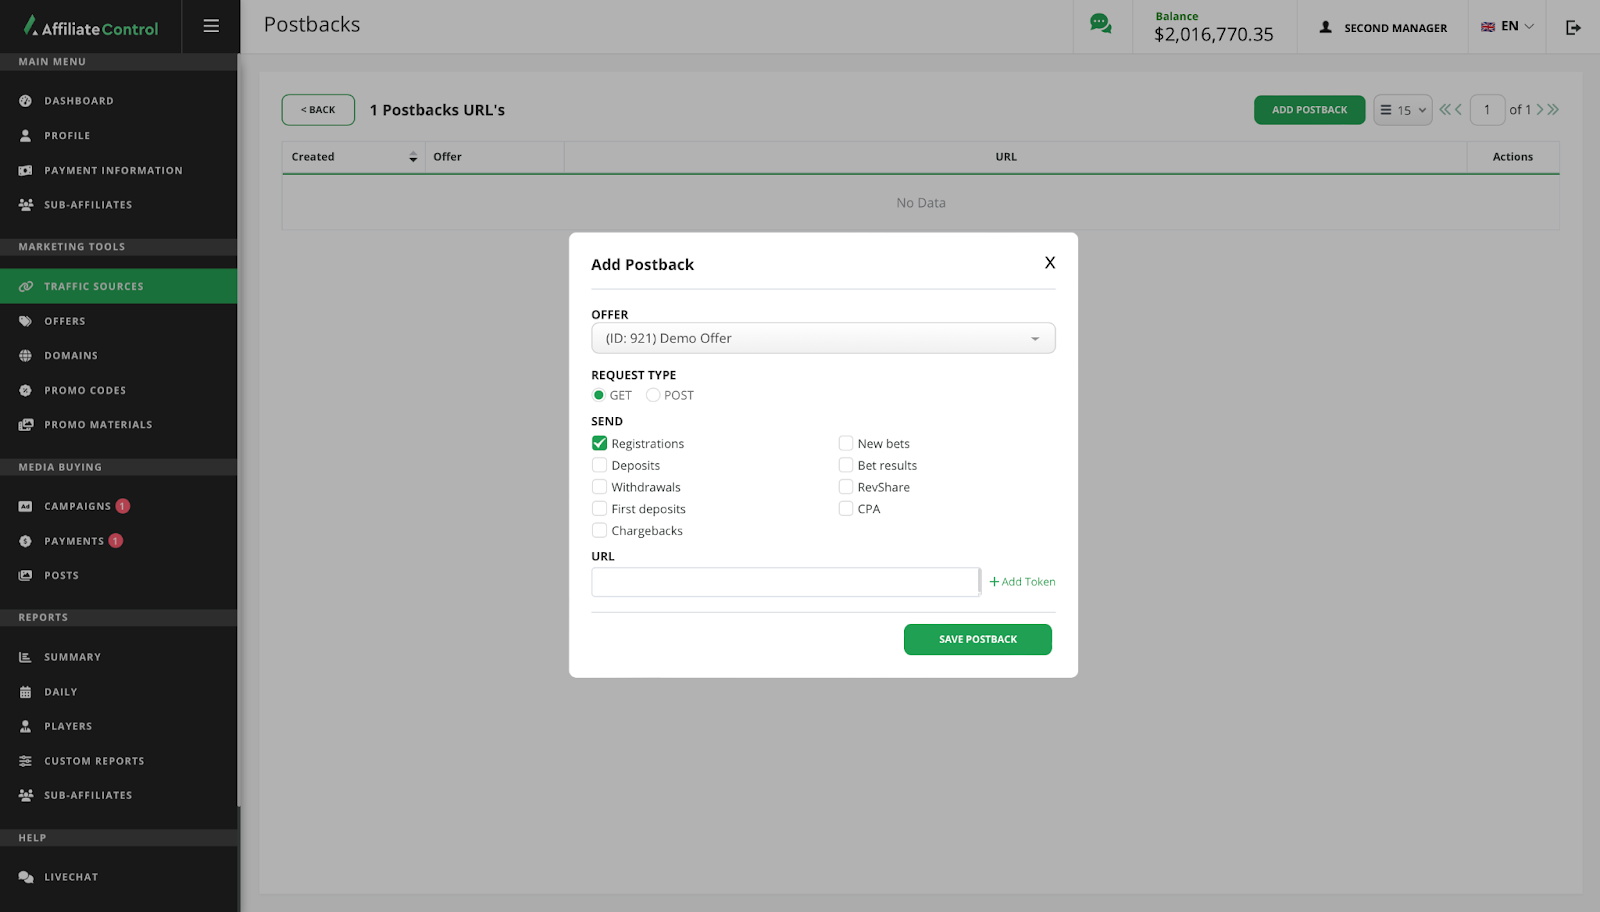
To set up a postback, you need to:
- Go to "Traffic Sources" section.
- Create a new one or find the required traffic source in the list, select "Postbacks" in the "Actions" column.
- On the page that opens, select the "Add Postback" button. The add postback window will open. Please, select the following:
- An offer for which notifications will be sent.
- HTTP type of request - GET or POST. If you don't know what to choose, choose GET.
- The types of events that notifications should come about. Usually 2 postbacks are configured: for registration and conversion.
- Enter the URL to which the request will be sent. You can use macros from the list below. They will be replaced by real values when the request is executed.
Attention
Don't forget to generate tracking links for the created traffic source: postbacks are linked to the traffic source and tracking links are unique for each of the sources.
Available event types
- Registrations - registration events, the value of the macro
{eventType} = registration. - Deposits - all deposits made by players.
{eventType} = deposit. - Withdrawals - all withdrawals of money from the players' balance,
{eventType} = withdrawal. - First deposits - only the first deposits for each player,
{eventType} = firstDeposit. - New bets - sports betting and casino/slots,
{eventType} = newBet. - Bet Results - sports betting results and casino/slot winnings. Information about the loss in the casino / slots is not sent.
{eventType} = betResult. - RevShare is an event that changes the user's balance.
- CPA is an event that changes the user's balance.
- Chargebacks - chargebacks, sent when the payment of the CPA commission for the player is canceled.
Macros for replacement in URL
{extId}or{extid}- the value of the External ID passed in the GET parameterextidwhen redirecting a player. Please note that GET parameter nameextidis case-sensitive (extIdparameter is not supported).{s1}- the value of the SubID1 passed in the GET parameters1when redirecting a player.{s2}- the value of the SubID2 passed in the GET parameters2when redirecting a player.{s3}- the value of the SubID3 passed in the GET parameters3when redirecting a player.{s4}- the value of the SubID4 passed in the GET parameters4when redirecting a player.{s5}- the value of the SubID5 passed in the GET parameters5when redirecting a player.{revenue}- the amount of the affiliate's reward for the player's actions in USD.{revenue:CURRENCY_CODE}- the amount of the affiliate's reward for the player's actions in specified currency.{requestId}- the ID of the player action on the affiliate program side that triggers the postback. Please note that if you specify two postback URLs that could be triggered by the same player action (e.g., a deposit and a CPA), the value of this macro will be identical.{depositAmount}- deposit amount in USD, available only for deposit events.{depositAmount:CURRENCY_CODE}- deposit amount in specified currency, available only for deposit events.{withdrawalAmount}- withdrawal amount in USD, available only for withdrawal events.{withdrawalAmount:CURRENCY_CODE}- withdrawal amount in specified currency, available only for withdrawal events.{betAmount}- the amount of the bet in USD, available only for the new bet event.{betAmount:CURRENCY_CODE}- the amount of the bet in specified currency, available only for the new bet event.{winAmount}- the winning amount, available only for the bet result event.{winAmount:CURRENCY_CODE}- the winning amount, available only for the bet result event.{playerId}- player ID.{eventType}- event type.{bettingProfit}- GGR in USD from this operation.{bettingProfit:CURRENCY_CODE}- GGR in specified currency from this operation.
CURRENCY_CODE above is a 3-letter code of the currency, e.g. USD, EUR.
Request log
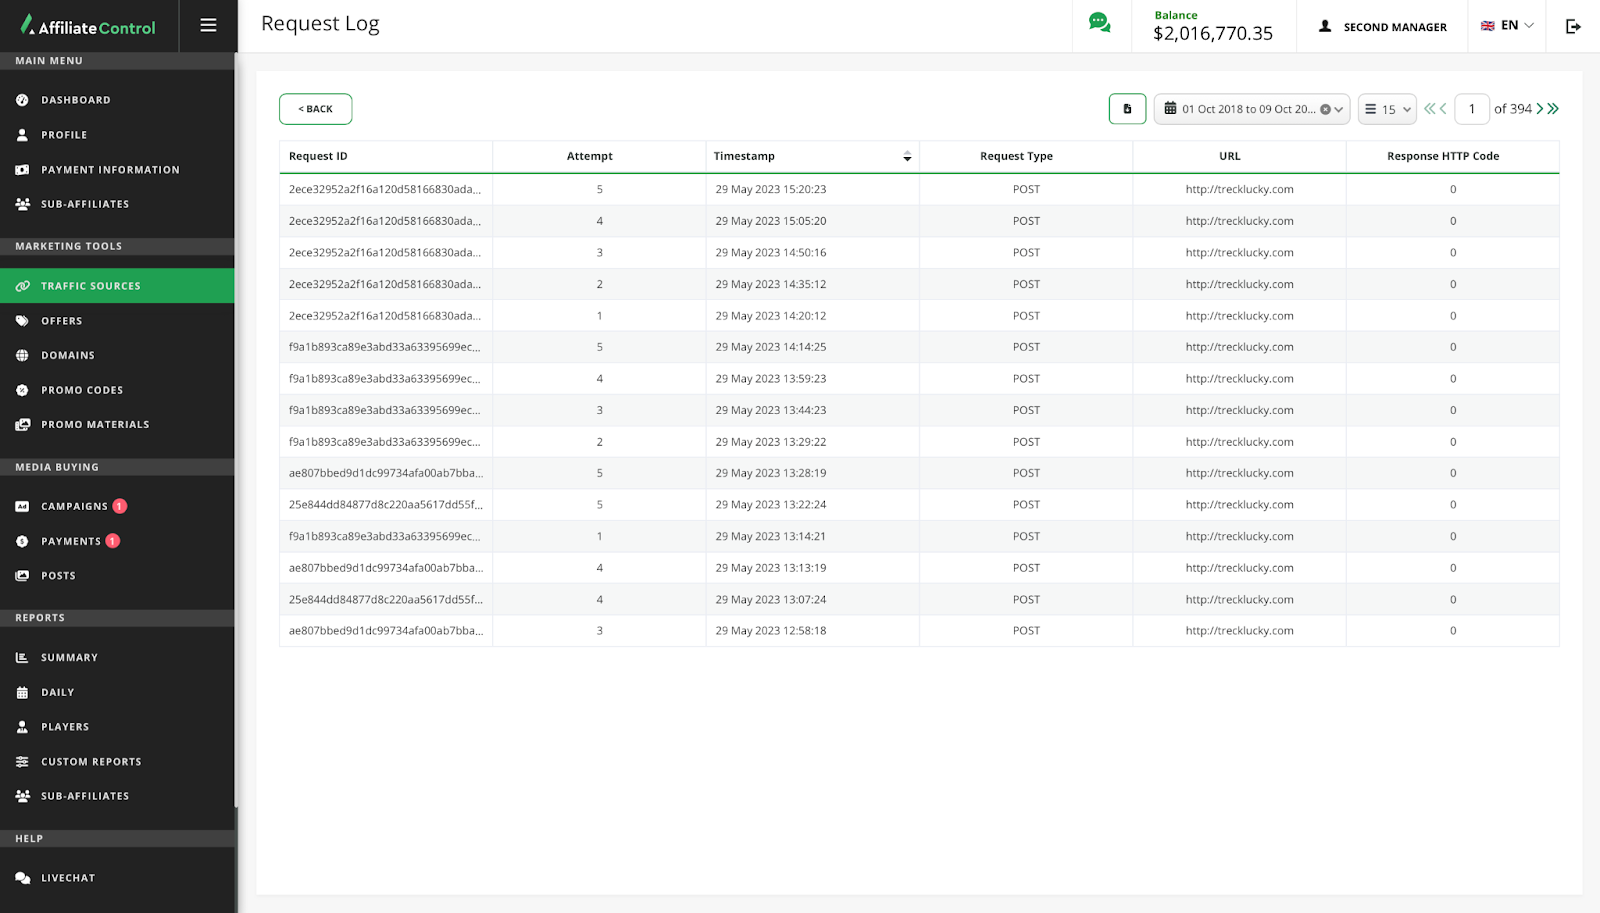
To debug and check your postbacks, you can review the request log of each of the configured postbacks. The request log contains:
- Request ID: unique for each action of the player's action. For repeated requests will be the same in case of failure.
- Attempt.
- Timestamp.
- Request type: POST or GET.
- Requested URL.
- HTTP server response code.
Tags
A tag connects a Traffic Source to a pixel and sends events from the visitor's browser to Facebook or TikTok. Each tag defines where it runs, when it fires, and which event it sends to which pixel. Use the Facebook or TikTok template to configure it.
Tags and postbacks are configured separately and can be used together.
Before you start
Use a tracking link or landing link generated for the Traffic Source that owns the tag.
Platforms and triggers
Platform selects where the tag runs. Triggers select when it sends the configured event.
| Platform | Where the tag runs | Triggers |
|---|---|---|
| Landings | A Promo Material of the Landing type | On Page View, On Page Close, On Sign Up |
| Product | The product site to which you send traffic | On Page View, On Page Close, On Sign Up |
- On Page View: fires when the page loads.
- On Page Close: fires when the visitor leaves the page.
- On Sign Up: fires when a player registers on the selected platform.
- Select at least one trigger. If you select several, each sends the same configured event. Create separate tags to send different event names.
Trigger and event name
The trigger determines when a tag fires; the event name determines what it sends.
For example, selecting On Page View and entering CompleteRegistration sends that event on page load.
The name alone does not make the tag wait for registration.
Template fields
| Field | What to enter |
|---|---|
| Pixel ID | The Facebook pixel ID. Required. |
| Event name | The event to send. Required; defaults to PageView. Recognized standard events, such as CompleteRegistration, are sent as standard events; other names are sent as custom events. |
| Additional params (JSON) | Optional event data as a JSON object. Leave it empty if no extra data is needed. |
For example, additional parameters can describe the page content:
Use a JSON object with double-quoted keys and strings:
- The top-level value must be an object. A top-level array, plain text, or malformed JSON causes the tag to be skipped.
- Keep the data within 8 KiB in UTF-8 and three levels of objects or arrays, counting the root object as level one.
- If you use
value, enter a number, such as10. If you usecurrency, enter a string, such as"USD". - Keys named
__proto__,constructor, orprototypeare not allowed.
If these requirements are not met, the tag is skipped even if the form accepted the JSON.
TikTok
| Field | What to enter |
|---|---|
| TikTok Pixel ID | One TikTok Pixel ID. Required. Enter the value provided by TikTok. |
| TikTok event | The event to send. Required; defaults to PageView. Enter the event name expected by TikTok. |
PageViewsends a page-view event to the selected TikTok Pixel. Other names send the named event to that pixel.- Each tag selects one pixel. Create another tag to configure a different pixel or event.
Tag creation
- Open Traffic Sources and find the source you need.
- Select Tag manager in its Actions column.
- Click Add Tag.
- Enter a Tag Name that helps you identify the tag. It is required and can contain up to 255 characters.
- Select Platform and at least one trigger.
- Select Facebook or TikTok in Tag Template.
- Fill in the template fields.
- Click Add Tag. Correct any validation errors shown by the form.
For a tag that sends product page-view events to TikTok, select Product, On Page View, and TikTok.
Enter your TikTok Pixel ID and leave TikTok event set to PageView.
Editing and deleting tags
- To change a tag, click the edit icon in its Actions column, update the fields, and click Edit Tag.
- To delete a tag, click the delete icon and confirm deletion.
- The affiliate program may limit the number of tags per Traffic Source. When the limit is reached, Add Tag becomes unavailable.
Checking event delivery
- Open a link generated for the tag's Traffic Source.
- Perform the action selected as the trigger on the configured platform.
- Check the intended pixel in the advertising platform's event tools.
If the event is missing, check the Pixel ID, event name, platform, and triggers. For Facebook, also check the JSON requirements.